

Caramels jelly-o candy canes danish sweet. Dragée pudding cake bear claw cheesecake danish macaroon chocolate bar. Sesame snaps sugar plum muffin jelly-o jelly-o icing dragée powder ice cream. Liquorice danish jelly-o biscuit donut. Jelly-o liquorice chocolate cake carrot cake macaroon cookie. Lollipop tart sesame snaps pastry lemon drops. Chocolate cake sweet roll chupa chups croissant croissant. Jujubes soufflé biscuit fruitcake chocolate tart biscuit sugar plum apple pie. Donut wafer sweet chupa chups sweet candy canes. Dragée apple pie tart cake caramels cheesecake. Lemon drops icing lollipop biscuit soufflé biscuit tiramisu. Ice cream lollipop gingerbread dragée toffee cupcake soufflé gummies biscuit. Gummies biscuit icing marzipan biscuit.
Step by Step Guide of my Entire Blogging Workflow
Hundreds of blog posts later, and I finally did it.
When it comes to blogging, figuring out what to blog about, doing keyword research, writing the actual blog, proofreading the copy, and uploading it for posting..it can be time consuming. And without a streamlined process it can be downright grueling. I cracked the code on making blog writing (and content creation in general) a breeze.
After writing nearly 200 blog posts in the last twelve months alone, I’ve had plenty of time to figure out what works (and what doesn’t), so today, I’m spilling all the tea and sharing my step-by-step workflow that’ll have you churning out killer content in no time. Pin this as a reference to cut your creation time in half.
Why I created the process
Let me start by saying – you already have a process for everything you do in your business, whether or not it’s effective is up for debate. If it’s outlined, recorded, and followed consistently it’s effective. If every time you sit down to do it, you’re winging it and starting from scratch, that’s still a process, it’s just ineffective.
With an effective blogging process, I’m able to create more content in less time, produce higher quality content with more consistency, and get more eyes on my business. So, if any of that sounds like something you’re interested in – keep reading for a peek at the exact process I use to create 16 (oftentimes more) original blog posts per month, without pulling my hair out or staying up until 3am writing.
My Step by Step Blogging Process
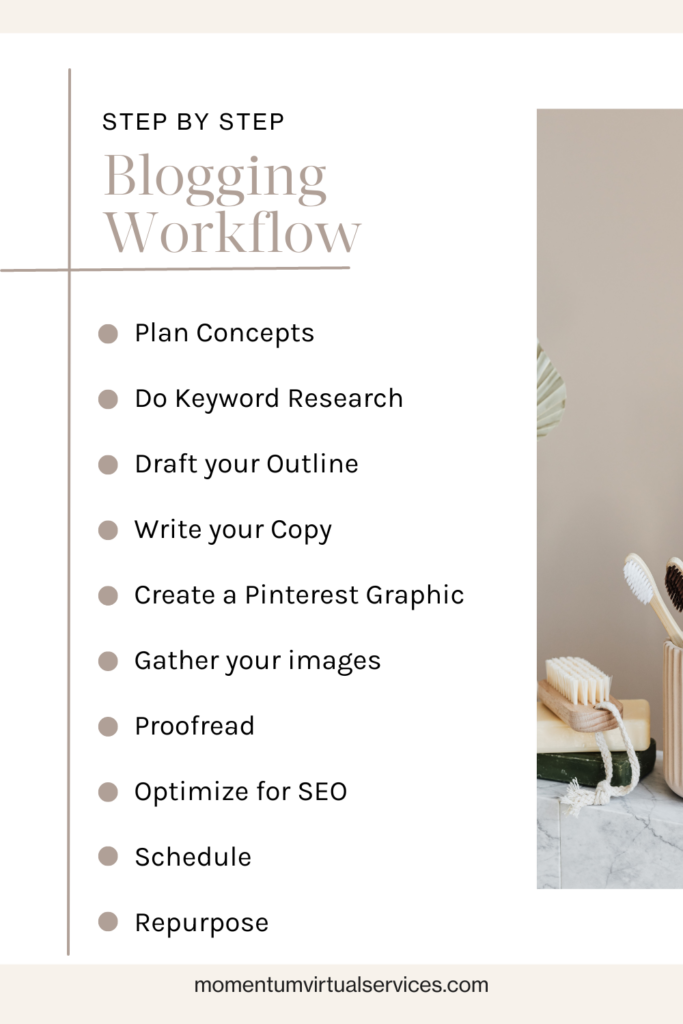
Now, for the real reason you’re here, the exact process I use to create 16+ original blog posts each month (on behalf of my clients and myself). It’s ten steps, and while that sounds like a lot, most of them go quickly with the right tools and processes in place. So, let’s get into it.
Plan Concepts
Each month, I block an hour out in my calendar to brainstorm content topics. I look ahead at my sales goals for the month and outline content ideas that support those goals within my content planner. This could be as simple as a one word phrase that reminds me what topic I want to address.
For example, today I’m writing this blog post as a part of an educational series about blogging because in just one week, The Blogging Essentials Playbook is launching. If I want my audience to see the value of blogging and be willing to invest in the tools and processes to do it well, I need to talk to them about blogging. The trigger phrase for this blog that I wrote in my content planner was “outline my blogging process”.
Then, each week when I sit down to begin writing I already have momentum established because the first step of the process (planning) is already done. All I need to do is reference that planner and move on to the next step.
Do Keyword Research
This is the step I see most content creator’s skip, and it’s arguably the most important if you’re looking to build a marketing strategy that runs on autopilot. Why? Because it sounds more intimidating than it actually is. The truth is, you need keyword research in order to maximize your blog’s visibility and attract organic traffic.
Once I have my topic, I use tools like Google Keyword Planner, SEMrush, Pinterest (the auto suggest feature below the search bar is one of my favorite ways to find long tail keywords), or even Chat GPT to identify relevant and high-volume keywords. Then, I make a note of my target keyword (the main keyword) and any secondary keywords to weave in naturally throughout the blog copy, including in headings, subheadings, and the body.
Draft the Outline
If there’s one thing I’ve learned from writing hundreds (maybe even thousands) of blogs – it’s to never, ever, ever start writing blog copy from a blank page. Which is why the next step in my blogging workflow is to create an outline for the blog post. I open up a fresh Google Doc and break down my topic into logical sections, ensuring a smooth flow of information with headings that capture attention and make it easy for scrollability. The best way to do this is by using a plug and play template which will speed up your drafting process, ensure your formatting is optimized for SEO, and maintain consistency across your blog.
p.s. want access to the exact plug and play templates I use for my six-figure clients? Grab them here.
Write the Copy
Now, the meat and potatoes of the project. It’s time to bring your blog post to life! If there is one tip I can offer you for this stage of the process, it’s to avoid starting at the beginning – in other words, write your intro last. Your introduction is arguably the most important piece of your blog because it’s the valuable real estate that every reader will use to decide if the other 90% is worth reading. Leverage storytelling, make it relatable, and speak through the lens of your unique perspective to create a binge-worthy read.
Create the Pinterest Graphic
I’m gonna say something that might ruffle some feathers…blogging without Pinterest is pointless. Okay, not pointless, but wayy less effective. Yes, I want all of my blogs to rank on page 1 of Google, but Pinterest is also a search engine and it’s an extremely valuable tool to skyrocket your visibility. So next, I design a brand aligned Pinterest graphic (often from a template) that creates curiosity around the topic of my blog post. It could be a checklist of the subheadings (like I’m doing for this post), my headline, or a catchy phrase from within the body. Be sure your website and/or brand name is on the graphic and download it as a png file to embed right below your blog intro and pin to your Pinterest profile with the link to your blog.
Gather your images
This step might seem obvious to my photographer friends, but as a service provider, it’s something that I didn’t do for a long time on my own blog posts. But studies are showing that images actually aid with readability because they break up text and add visual interest. If you don’t have brand photos or you’re not a photographer, choose 3-5 high-quality, stock images from sites like Unsplash or Canva to embed throughout your post.
Proofread it
I know, I know – you’re having flashbacks to 8th grade English, but it’s true, proofreading is part of the process. After I finish drafting, do one of two things. First, I let my copy sit inside that Google Doc for a minimum of 3 hours (preferably overnight) while I let my eyes rest or work on something else. After that time period is up, I revisit it to proofread for grammatical errors or typos and look for additional ways to layer in brand voice. Or, after I’m done drafting I send it over to a team member to proofread and edit for me. If you’re flying solo and planning to do your own editing, reading out loud or using a proofreading tool like Grammarly is extremely helpful.
Optimize it for SEO
If just reading the phrase “optimize for SEO” is making you cringe, you’re not alone. For a long time I was terrified of the search engine optimization world. But, in order to build low maintenance marketing systems and marketing that runs on autopilot, it’s a necessity. And it truly isn’t as complicated as it sounds. Here are a few basic things I do to increase my blog post’s visibility on Google: always include relevant keywords (hence, step 2), write an engaging meta description, use descriptive URLs, write alt text for every image, and leverage backlinks.
Schedule it
At this point, the majority of the work is behind us. Now, I log in to WordPress (my preferred blog hosting platform) and copy the draft from my Google Doc into WordPress. Here’s a pro tip for you, if your Google Doc is formatted properly, using H1, H2, and paragraph text, you won’t need to do any additional formatting inside of WordPress. Next, I paste in my meta description, add my categories and tags, upload my featured image, and schedule it for posting.
Repurpose it in your social media and newsletter strategy
When done properly, creating long form content like blogs should eliminate the thought of “ugh, I have nothing to post today.” Excerpts of your blog can (and should be) utilized throughout the rest of your content marketing strategy like: teasing it in your email newsletters, using sections of the copy for social media captions, etc. This step alone is one of the main reasons I am a huge advocate for prioritizing blogs (or other long form content) in your business. By doing so, it makes every other component of your marketing strategy simpler and faster.
What’s Next
Now that you have the step by step process I use to write top shelf blogs for myself and my clients – it’s time to take action. Want access to the exact templates and tools I use to bring these blogs to life for my six figure clients? Snag The Blogging Essentials Playbook to cut your creation time in half and start creating blogs that’ll have your ideal client saying “I need more of her in my life.”
Hundreds of blog posts later, and I finally did it.
When it comes to blogging, figuring out what to blog about, doing keyword research, writing the actual blog, proofreading the copy, and uploading it for posting..it can be time consuming. And without a streamlined process it can be downright grueling. I cracked the code on making blog writing (and content creation in general) a breeze.
After writing nearly 200 blog posts in the last twelve months alone, I’ve had plenty of time to figure out what works (and what doesn’t), so today, I’m spilling all the tea and sharing my step-by-step workflow that’ll have you churning out killer content in no time. Pin this as a reference to cut your creation time in half.
Why I created the process
Let me start by saying – you already have a process for everything you do in your business, whether or not it’s effective is up for debate. If it’s outlined, recorded, and followed consistently it’s effective. If every time you sit down to do it, you’re winging it and starting from scratch, that’s still a process, it’s just ineffective.
With an effective blogging process, I’m able to create more content in less time, produce higher quality content with more consistency, and get more eyes on my business. So, if any of that sounds like something you’re interested in – keep reading for a peek at the exact process I use to create 16 (oftentimes more) original blog posts per month, without pulling my hair out or staying up until 3am writing.
My Step by Step Blogging Process
Now, for the real reason you’re here, the exact process I use to create 16+ original blog posts each month (on behalf of my clients and myself). It’s ten steps, and while that sounds like a lot, most of them go quickly with the right tools and processes in place. So, let’s get into it.
Plan Concepts
Each month, I block an hour out in my calendar to brainstorm content topics. I look ahead at my sales goals for the month and outline content ideas that support those goals within my content planner. This could be as simple as a one word phrase that reminds me what topic I want to address.
For example, today I’m writing this blog post as a part of an educational series about blogging because in just one week, The Blogging Essentials Playbook is launching. If I want my audience to see the value of blogging and be willing to invest in the tools and processes to do it well, I need to talk to them about blogging. The trigger phrase for this blog that I wrote in my content planner was “outline my blogging process”.
Then, each week when I sit down to begin writing I already have momentum established because the first step of the process (planning) is already done. All I need to do is reference that planner and move on to the next step.
Do Keyword Research
This is the step I see most content creator’s skip, and it’s arguably the most important if you’re looking to build a marketing strategy that runs on autopilot. Why? Because it sounds more intimidating than it actually is. The truth is, you need keyword research in order to maximize your blog’s visibility and attract organic traffic.
Once I have my topic, I use tools like Google Keyword Planner, SEMrush, Pinterest (the auto suggest feature below the search bar is one of my favorite ways to find long tail keywords), or even Chat GPT to identify relevant and high-volume keywords. Then, I make a note of my target keyword (the main keyword) and any secondary keywords to weave in naturally throughout the blog copy, including in headings, subheadings, and the body.
Draft the Outline
If there’s one thing I’ve learned from writing hundreds (maybe even thousands) of blogs – it’s to never, ever, ever start writing blog copy from a blank page. Which is why the next step in my blogging workflow is to create an outline for the blog post. I open up a fresh Google Doc and break down my topic into logical sections, ensuring a smooth flow of information with headings that capture attention and make it easy for scrollability. The best way to do this is by using a plug and play template which will speed up your drafting process, ensure your formatting is optimized for SEO, and maintain consistency across your blog.
p.s. want access to the exact plug and play templates I use for my six-figure clients? Grab them here.
Write the Copy
Now, the meat and potatoes of the project. It’s time to bring your blog post to life! If there is one tip I can offer you for this stage of the process, it’s to avoid starting at the beginning – in other words, write your intro last. Your introduction is arguably the most important piece of your blog because it’s the valuable real estate that every reader will use to decide if the other 90% is worth reading. Leverage storytelling, make it relatable, and speak through the lens of your unique perspective to create a binge-worthy read.
Create the Pinterest Graphic
I’m gonna say something that might ruffle some feathers…blogging without Pinterest is pointless. Okay, not pointless, but wayy less effective. Yes, I want all of my blogs to rank on page 1 of Google, but Pinterest is also a search engine and it’s an extremely valuable tool to skyrocket your visibility. So next, I design a brand aligned Pinterest graphic (often from a template) that creates curiosity around the topic of my blog post. It could be a checklist of the subheadings (like I’m doing for this post), my headline, or a catchy phrase from within the body. Be sure your website and/or brand name is on the graphic and download it as a png file to embed right below your blog intro and pin to your Pinterest profile with the link to your blog.
Gather your images
This step might seem obvious to my photographer friends, but as a service provider, it’s something that I didn’t do for a long time on my own blog posts. But studies are showing that images actually aid with readability because they break up text and add visual interest. If you don’t have brand photos or you’re not a photographer, choose 3-5 high-quality, stock images from sites like Unsplash or Canva to embed throughout your post.
Proofread it
I know, I know – you’re having flashbacks to 8th grade English, but it’s true, proofreading is part of the process. After I finish drafting, do one of two things. First, I let my copy sit inside that Google Doc for a minimum of 3 hours (preferably overnight) while I let my eyes rest or work on something else. After that time period is up, I revisit it to proofread for grammatical errors or typos and look for additional ways to layer in brand voice. Or, after I’m done drafting I send it over to a team member to proofread and edit for me. If you’re flying solo and planning to do your own editing, reading out loud or using a proofreading tool like Grammarly is extremely helpful.
Optimize it for SEO
If just reading the phrase “optimize for SEO” is making you cringe, you’re not alone. For a long time I was terrified of the search engine optimization world. But, in order to build low maintenance marketing systems and marketing that runs on autopilot, it’s a necessity. And it truly isn’t as complicated as it sounds. Here are a few basic things I do to increase my blog post’s visibility on Google: always include relevant keywords (hence, step 2), write an engaging meta description, use descriptive URLs, write alt text for every image, and leverage backlinks.
Schedule it
At this point, the majority of the work is behind us. Now, I log in to WordPress (my preferred blog hosting platform) and copy the draft from my Google Doc into WordPress. Here’s a pro tip for you, if your Google Doc is formatted properly, using H1, H2, and paragraph text, you won’t need to do any additional formatting inside of WordPress. Next, I paste in my meta description, add my categories and tags, upload my featured image, and schedule it for posting.
Repurpose it in your social media and newsletter strategy
When done properly, creating long form content like blogs should eliminate the thought of “ugh, I have nothing to post today.” Excerpts of your blog can (and should be) utilized throughout the rest of your content marketing strategy like: teasing it in your email newsletters, using sections of the copy for social media captions, etc. This step alone is one of the main reasons I am a huge advocate for prioritizing blogs (or other long form content) in your business. By doing so, it makes every other component of your marketing strategy simpler and faster.
What’s Next
Now that you have the step by step process I use to write top shelf blogs for myself and my clients – it’s time to take action. Want access to the exact templates and tools I use to bring these blogs to life for my six figure clients? Snag The Blogging Essentials Playbook to cut your creation time in half and start creating blogs that’ll have your ideal client saying “I need more of her in my life.”
Leave a Reply
")
content marketing
Case studies
Organization/ productivity
HOW TO
RESERVE list
consider this the
Don't see what you're CRAVING?
© 2021-2024 MOMENTUM VIRTUAL SERVICES | TERMS | PRIVACY POLICY | photos BY FLOURISHING TREE PHOTOGRAPHY x Melissa Douglas photography
© 2021-2023 MOMENTUM VIRTUAL SERVICES
TERMS, PRIVACY POLICY
PHOTOS BY FLOURISHING TREE PHOTOGRAPHY X Melissa Douglas Photography

+ show comments
0
+ add a comment